Example: Display a Pods custom field and separator only when it has content
This article was inspired by a Beaver Themer user, who requested information on how to accomplish a similar scenario.
Here are some tasks that are covered in this article.
- Create a Pod to extend a standard WordPress post to add a custom field to the post editing page in the form of the standard WordPress visual editor.
- Create a simple Singular Themer layout.
- Add shortcode for the custom field to a Singular Themer layout, plus the title, image and section separator.
- Use CSS to style the output of the custom field and its accompanying title, image, and separator.
- Add conditional shortcode so the custom field only displays when it has content.
The target
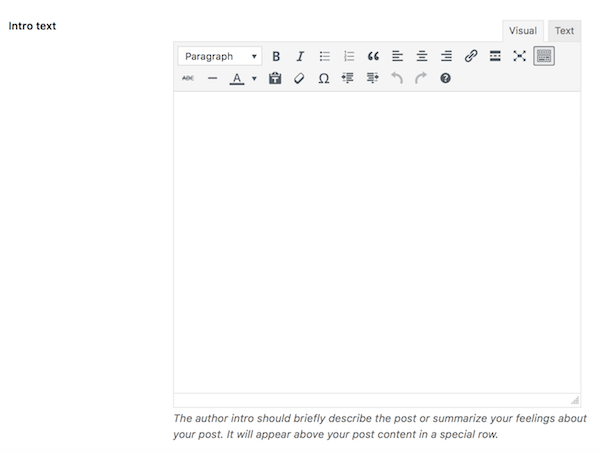
Here's what we're building. In this example, when an author is creating a post, he or she gets a special editing box below the post content to add intro text, with instructions about what to add, as shown in the following screenshot.
This editing box is provided by creating a Pod with the Pods plugin. The pod extends standard Posts to add this custom field. The intro content is not required, but when the author provides it, it's displayed below the post info and above the post content, as shown in the following screenshot. So one requirement is to display this section only when the custom field has content.
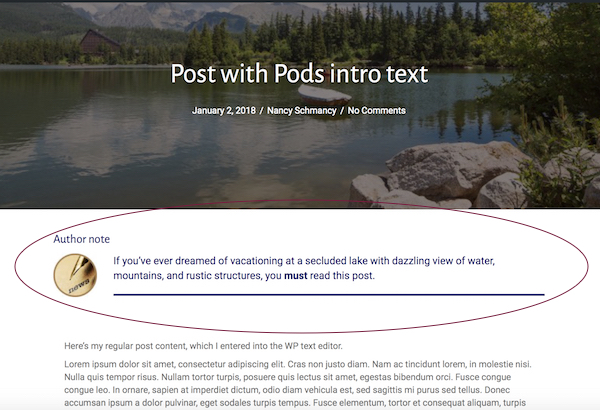
The post shown in this screenshot is controlled by a Singular Themer layout. The author intro section contains the title "Author intro," the image, the custom field content, and a separator, and it appears above the post content only when the custom field has content.
Why put the Author note into a custom field? After all, an author could just include it at the beginning of the post. Here are a few reasons:
- You want to assign special formatting to this introduction that's different from the post content.
- You want to remind authors to write an intro by providing the special editing box on the post editing page, with information about what sort of content you're looking for, as shown in this screenshot.
- You want to make the author note a requirement, and you can enforce that with a required custom field. In this example, the field is not required,
Before you start
You'll need to have a WordPress test site set up to complete these procedures yourself.
Install the Pods – Custom Content Types and Fields plugin and the Pods Beaver Themer Add-on plugin. Both are available by searching at Appearance > Plugins > Add new.
This Beaver Themer plugin must be installed. Beaver Themer is a premium add-on to the Beaver Builder plugin.
Build it
1 Create the Pods custom field
- From the WordPress admin panel, click Pods admin.
- You can create a custom post type or add an extension to a WordPress content type. In this case, we'll add a custom field to standard WordPress Posts, so click Extend existing.
- Set Content type to Post types and set Post types to Post, then click Next step.
- In the Manage fields section, click Add field.
- Add the following information:
* **Label**: Intro text
* The **Name** field autofills to **intro_text**.
* **Description**: The text that appears below the field's editing box on the post editing page. In this case, we added **The author intro should briefly describe the post or summarize your feelings about your post. It will appear above your post content in a special row.**
* **Field type**: WYSIWYG (Visual editor)
- Click Save field and Save pod.
2 Add custom field content to a post
- In the WordPress admin panel, click Posts and edit an existing post or add a new one.
- Scroll below the content editor to find the Intro text field.
- Enter some intro text in your custom field.
- Publish or update your post.
3 Add an HTML module to a Singular Themer layout with custom HTML and field connection shortcode
- In the WordPress admin panel, click Beaver Builder.
If you don't see Beaver Builder in the menu, see this article on enabling it. - On the Themer layouts page, click strong >Add new.
- Add a title and change Layout to Singular and click Add Themer layout.
- In the Location section, click Choose and select Post, then choose the name of the post that contains the custom field content.
- To ensure your intro section will only appear on posts that have content in this custom field, click Add location rule and add one other post that doesn't have content in this custom field.
You might need to create another post if you don't already have one, or you can do this step later. - Click Publish.
4 Add the custom field shortcode and HTML
Open the Singular Themer layout in Beaver Builder.
Click the Preview as bar at the top of the page and choose Post, then choose the name of the post that contains the custom field content.
We'll use the template that comes with the Singular Themer layout.Drag an HTML module into the same row above the Post Content module.
Note: If you drag the HTML module into a new row, that row will take up some space even when the author note doesn't display. If you know PHP, you can hide entire rows or modules.Create the field connection shortcode for the custom field.
Click the Plus icon to the right of the editing box in the HTML module.
Scroll to the Pods section and click Insert on the Field or related field line.
For Field name, choose intro_text (wysiwyg), then click Save.
The shortcode[wpbb post:pods_display field='intro_text']should now be visible in your HTML module edit box.
Tip: Inserting the shortcode this way is the best way to get the parameters correct in the shortcode.Paste the following code beneath the shortcode line.
<div class="intro-text">
  <h2>Author note</h2>
  <p><img src="http://example.com/bb20/wp-content/uploads/2017/06/news-callout-e1514929087867.jpg"
  alt="Author intro icon" align="left">[wpbb post:pods_display field='intro_text']</p>
  <hr>
</div>
Change the image URL in the markup to point to a small image in your site's Media Library.
Cut the shortcode that you created on the first line and use it to replace the shortcode in the HTML just after the image.
If you used the same custom field name, it should be identical.Click Save to save the HTML module and click Done > Publish to save the Themer layout.
At this point, the pieces are there (title, image, custom field content, separator), but they need styling.

5 Add custom CSS to style the section
We'll change the text color, change the heading font size, make the separator larger and change its color, and add more padding between the image and the text.
Add the following CSS to any of the global locations for CSS.
See this article. We added it to Customize > Additional CSS./* Styling for Author note */
.intro-text h2 {
color: #00006f;
font-size: 22px;
.intro-text p {
color: #00006f;
font-size: larger;
}
.intro-text img {
padding-right: 30px;
}
.intro-text hr {
border-color: #00006f !important;
border-width: 4px !important;
margin-top: 20px ;
}We added
!importantto a couple of the rules to override existing styling.
Your author note should now look like the first screenshot in this tutorial.
6 Add conditional shortcode so the section displays only when the custom field has content
Why did we put the title, image, custom field and separator all into the HTML module instead of building separate modules for them? Because we want to hide all of that for any post that has no content in that custom field.
The way we hide it is by wrapping the code in the HTML module with a conditional shortcode for that field connection. The conditional will do a Boolean evaluation of the shortcode in the conditional statement: if the field connection shortcode returns content, then TRUE is returned, and everything that appears between [wpbb-if] and [/wpbb-if] will be implemented. If the conditional evaluates to FALSE, then everything between the [wpbb-if] tags is ignored.
Open the Themer layout in Beaver Builder and open the HTML module for editing.
Wrap the existing code in the edit box with conditional shortcode. The contents of the edit box should now look something like this:
[wpbb-if post:pods_display field='intro_text']
  <div class="intro-text">
    <h2>Author note</h2>
      <p><img src="http://ss-sites.com/bb20/wp-content/uploads/2017/06/news-callout-e1514929087867.jpg"
  alt="Author intro icon" align="left">[wpbb post:pods_display field='intro_text']</p>
    <hr>
  </div>
[/wpbb-if]
Notice that the field connection in the
[wpbb-if]shortcode is identical to the field connection shortcode that appears after the image. Paraphrased, this code is saying "if this post:pods field connection returns content, then display everything until the closing conditional tag."Save the HTML module and publish the Themer layout.
Test the conditional by viewing a post that doesn't have any content in this custom field. It should not display any part of the author note.